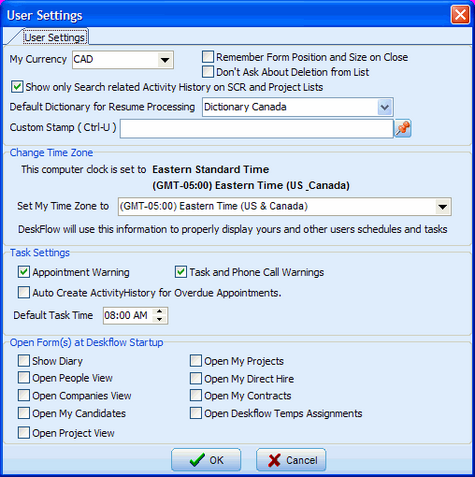
The User Settings screen enables a User to define a number of options such as my currency, my time zone, task and appointment settings, default forms and form positions.
To Open User Settings Menu
1.In the Deskflow menu, click Edit > User Settings

Currency Settings
In a Multi-Currency implementation of Deskflow, each User can be assigned a default Currency type.
When a User hovers the mouse over a currency value in one of the Deskflow screens (grids excepted), the displayed currency value is converted to the User's Default Currency Type and temporarily displayed.
To Change My Currency:
2.In the Deskflow menu, click Edit > User Settings
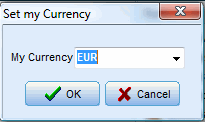
3.In the My Currency option, select a default currency from the drop down list
4.Click OK
Example: Change My Currency

To Remember Form Position And Size On Close:
Customized form sizes and locations of Deskflow views are remembered in the Windows Registry in HKEY_CURRENT_USER > Software > WFI > DFE
This is a setting that will be used only for your Login on this computer and no other User will be affected.
1.From the Deskflow Toolbar, click Edit. The Edit drop down list appears.
2.Click Remember Form Position And Size On Close to set the warning flag On or click again to turn it Off. A check mark indicates that the warning is On. Please see topic called: Fix Screen Resolution Problems
My Time Zone Setting
When logging into Deskflow while in a different time zone relative to UTC time, the prompt to change time zone will automatically appear when logging in. This setting applies to your login only.
To Change My Time Zone Setting:
1.In the Deskflow menu, click Edit > User Settings.
2. Change My Time Zone. The Change My Time Zone dialogue box appears. The present time zone setting is listed in the dialogue box.
3.Click the Set My Time Zone To drop down list and select the new time zone.
4.Click Change. A pop up message appears and all tasks related to time are updated to display the new time zone. The Deskflow Tool bar also displays the time zone setting in the title bar at the top.
Task Settings
To Set the Appointment Warning On or Off:
1.In the Deskflow menu, click Edit > User Settings.
2.Click Appointment Warning On to set the warning flag On or click again to turn it Off. A check mark indicates that the warning is On.
To Set the Task and Phone Call Warning to On or Off:
These settings can be selected to turn on or off task and phone call warnings specifically for your login profile.
1.In the Deskflow menu, click Edit > User Settings.
2.Click Task and Phone Call Warnings On to set the warning flag On or click again to turn it Off. A check mark indicates that the warning is On.
To Set Auto Create Activity History For Overdue Appointments:
This option prevents excessive build-up of uncompleted tasks. This is a setting that will be used only for your login and no other User will be affected by this.
1.From the Deskflow Toolbar, click Edit. A pop-up list appears.
2.Click Auto Create Activity History For Overdue Appointments to set the warning flag On or click again to turn it Off. A check mark indicates that the warning is On.
Open Forms at Deskflow Startup
Selection of any of these options will cause Deskflow to automatically open the selected views immediately after Deskflow starts up:
•Show Diary (on Startup)
•Open People View (on Startup)
•Open Companies View (on Startup)
•Open My Candidates (on Startup)
•Open Project View (on Startup)
•Open My Projects (on Startup)
•Open My Direct Hire (on Startup)
•Open My Contracts (on Startup)
•Open Deskflow Temp Assignments (on Startup)