Add a New Company in these ways:
•Enter a Company profile using the Add New Company button.
•Enter multiple Company profiles from an Excel spreadsheet.
•Enter multiple Company profiles from an Outlook contact list.
•Enter a Company on a Quick Entry form.
•Enter a Company as an EmployerName from the Career Centre registration form.
•Enter a Company as an EmployerName by parsing a resume attached to an email.
To Add a Company Using the Quick Entry Form:
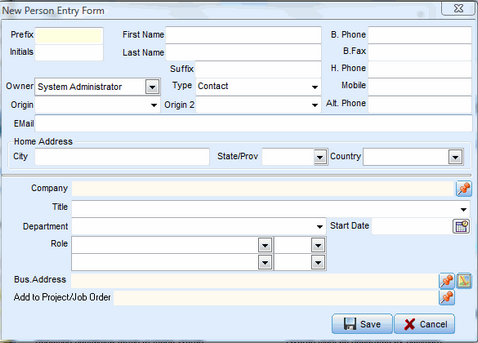
The Quick Entry form is for entering minimal information, such as from a business card.
1.Click on bank space on the Deskflow Menu.
2.Press CTRL+N to open a New Person Entry Form.
3.Enter Contact information.
4.Click the Link Company icon.
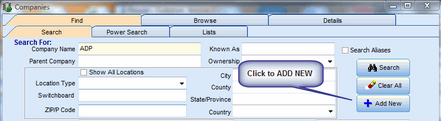
5.Click the Add New Company button.
6.Enter a new Company name.
7.Click OK.
8.Click Save.
Example: Quick Entry form for Company and Contact information
Add a Company Using the Full Data Entry Form:
The Full Data Entry form is a multi-tab form that is identical to the Deskflow Companies View.
There are many tabs or sub-forms in which data may be entered for a Company: General; Company Notes; Industries and Rate; Marketing Team; Addresses; Links; Details; Attributes; Contacts; Projects; Job Orders; Documents; Activity History; Notes.
To Add a New Company:
1.Enter the Company name in full.
NOTE: The icon to the right of the Company Name will zoom to Hoovers.com or equivalent site
2.Enter Known As or alias names for the Company. Add multiples if necessary. When two Companies are merged, the Known As field will contain the merged Company name.
3.Optionally enter Contact Name. This field does not get added to the People list.
4.Optionally enter Owner 1 and Owner 2 from the drop down list of Deskflow Users. These fields are searchable and assign custodians or marketing representatives to a Company. Often needed for determining sales commissions or compensation.
5.Enter Office from the customizable drop down list. It is a searchable field. This field is for Deskflow Clients operating multiple offices, sites or branches. Typical values are: New York, London, Paris, Toronto etc.
6.Enter Ownership code using the drop down list. It is a searchable field. Typical values are: Public, Private, Not for Profit
7.Enter Marketing Status using the drop down list. It is a searchable field. Typical values are: Active Client; Prospect; Preferred Account; Former Client.
8.Optionally enter Status1 and Status 2 from the drop down list. They are searchable fields. These two fields are left free for Deskflow Clients to use as needed.
9.Before entering a Parent Company name, click the Save Changes icon.
10.Link the new Company to a Parent Company by clicking the Link to Parent Company icon. Search for and select the Parent Company from the list.
11.Enter Link to Parent as from the drop down list of relationship types.
12.Enter optional Customer Number. This is needed when Deskflow has to pass Client-related information to a back-office accounting system.
13.Enter the optional Client Since date by clicking the Calendar icon. This indicates when a Company became a Client.
14.Enter the optional Review Date by using the Calendar icon. This date may be used to trigger marketing or financial reviews of Company records.
15.Enter the optional Annual Sales value.
16.Enter the optional Employee Count value.
17.Optionally check the Credit OK box.
18.Enter the optional Credit Limit value.
19.Enter the optional Web Page URL link.
20.Enter the optional Email address, main Switchboard number, Toll Free number and Fax number.
21.Enter optional Products information.
22.Enter optional list of competitors in the Competition field.
23.Enter unlimited length text in the Notes field, with optional time stamp on the Notes. Each time more notes are added, use click the Time Stamp icon to create reverse chronology notes.
24.In the Industry and Rates sub-tab, click the Add Link to Industry icon. Select an Industry Code from the list and set the Rank in Industry value from the drop down list. Click OK when done.
25.Click the Save Changes icon. If a new Company record is added without previously checking for duplicates, a message indicating that a duplicate Company already exists will be displayed. The User can then abandon the data entry process or choose to add a duplicate Company.
Example: Add New Company form
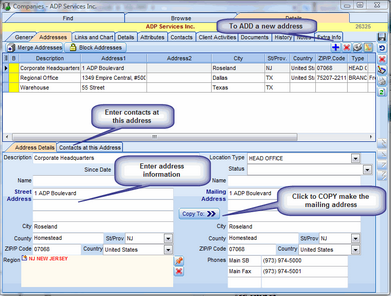
To Add a Company Address:
1.Find and display a Company view.
3.Click the Addresses tab.
4.Click the Create New Company Address icon. A blank data entry form is displayed.
5.Enter an optional Description for the address. The maximum field size is 120 characters.
6.Enter an optional Location Type from the drop down list. Typical values are: Head Office; Branch Office; Warehouse.
7.Enter an optional Since Date from the calendar.
8.Enter an optional Status from the drop down list. The maximum field size is 50 characters.
9.Enter three Street Address values. The maximum field size is 50 characters.
10.Enter City. The maximum field size is 50 characters.
11.Enter optional County as free text. The maximum field size is 50 characters.
12.Enter State/Province from the drop down list or enter free text.
13.Enter ZIP/Postal Code as free text. The maximum field size is 11 characters.
14.Enter Country from the drop down list.
15.Click the Copy To button to copy the physical address to the Mailing address section. Edit the contents of the Mailing address.
16.Enter a Region code for the address by clicking the Link Address to Region icon. The Region code has three levels.
17.Enter optional Address Related Phone Numbers.
18.Click the Save Changes icon.
Example: Add Company Address form
To Add Company Contacts:
1.Open a Company view.
2.Click the Contacts tab.
3.Click the Add New Person as Current Contact icon. A New Person Entry Form is displayed.
4.Enter minimum of First Name, Last Name and Title.
5.Optionally enter phone, email and address information.
6.Click Save.
7.Click the Save Changes icon.
To Assign Contacts to a Business Address:
1.Open the Company Addresses tab.
2.Select a Business address in the list of Addresses.
3.Click the Link Current Contact to Business Address icon.
4.Find and select Contacts to be linked to this Business Address, then click OK.
5.Click the Save Changes icon.
To Assign Attributes to a Company:
1.Open the Company Attributes tab.
2.Click the Add Attribute icon.
3.Select and check the Attributes to be added, then click OK
4.Click the Save Changes icon.
To Create a New Word Document for a Company:
1.Open the Company Documents tab.
2.Click the Create New Document icon.
3.Enter content into the Word document.
4.Click the Close window icon in the Word document.
5.Enter a document name then click Yes to save changes.
6.Enter a unique document name then click OK.
7.Click the Save Changes icon.
To Import an Existing Document to a Company:
1.Open the Company Documents tab.
2.Click the Import Document from File icon.
3.Find and select a document (any type) to be imported.
4.Click Open.
5.Modify the default document name then click OK.
8.Click the Save Changes icon.