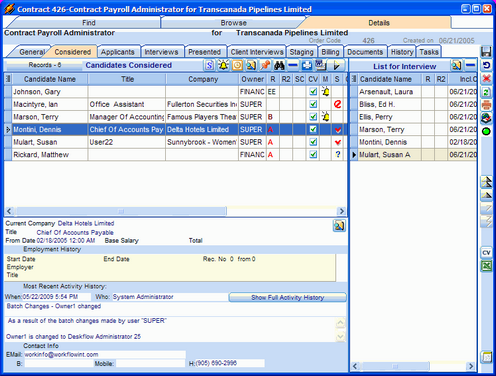
To Manage the Considered Candidates List:
1.Candidates found by searching the database are appended to the Candidates Considered list. This is usually a long list that will need screening to find the best available Candidates.
2.Important details of the currently selected Candidate are shown at the bottom half of the view. Details include employment history, activity history and contact information. A button is provided to zoom to detailed activity history.
3.To set a Left Message flag for a selected Candidate, click the Update Call Status icon (yellow bell), check applicable options, then click save. The ‘M’ column shows a bell symbol to indicate that a message has been left.
4.The ‘S’ column shows a symbol to indicate one of 3 triage status values:
•An Acceptable Candidate, from the Recruiter's perspective, has a red check mark √ in the S = Candidate Status column.
•A Pending Candidate, from the Recruiter's perspective, has a ? in the S = Candidate Status column.
•An Unacceptable Candidate, from the Recruiter's perspective, has a ![]() in the S = Candidate Status column.
in the S = Candidate Status column.
5.The ‘C’ column shows that the Candidate is off limits or blocked, because he/she is an employee of the Client.
6.The ‘P’ column shows that the Candidate is personally blocked because he/she is being considered for another position, and has either been presented to a Hiring Manager or is scheduled for an interview with the Hiring Manager.
7.To send an email to one or more selected Candidates (use ALT+Click to select multiple Candidates), click the E-mail to Selected Candidates icon, then complete the options dialog.
8.To zoom to a selected Candidate’s profile, double click the selected Candidate row, or click the Zoom to Candidate icon.
9.To add a specific person to the Candidates Considered list, click the Attach New Candidate (red push pin) icon, then find the Candidate of interest.
10.To remove a Candidate from the Candidates Considered list, click the blue Remove Candidate icon. This does NOT delete a Candidate’s profile, simply their name from the list.
11.To print a report, click the Print Report for Considered Candidates icon. The icon must first be assigned to an appropriate report by the Deskflow Administrator as detailed in the next paragraph.
12.To re-assign the Print Report for Considered Candidates icon to another report, right click, then select a report from the Grid Icon Reports section of Contract Job Orders reports. See Reports.
13.To mail merge to one or more selected Candidates using a Word template, click Create Letters for Considered Candidates icon, select an appropriate template, then double click to initiate the mail merge. See Mail Merge.
14.To forward a selected Candidate to the Interview stage (or subsequent stages), click the Move Selected Candidate to Interview List icon, then choose an option.
15.To remove a Candidate from the List for Interview, click the blue Remove Candidate icon.
16.To print any of the Job Order > A Assignments reports, click the Print Contract Report icon in the far right margin, then double click the selected report.
Example: Considered Candidates List
