This is a summary of the steps required to create Candidate Profiles using the Resume Importer utility on the Deskflow Tools menu. The Resume Importer can accept Resumes/CVs from three sources:
•Electronic documents stored on a hard drive
•Emailed Resume/CV attachments
•Resumes/CVs embedded in Deskflow Candidate profiles
Two types of Resume Importer are supported by Deskflow, based on configuration settings in the Deskflow Administrator utility. They are:
a.Native Deskflow Resume Importer - only extracts name and address for English Resumes/CVs
b.Sovren Resume Importer - extracts name, address, education, work history and skills in numerous languages. USA, France, Germany, Australia, India, Ireland, Netherlands, South Africa
Stage 1: Parse Resumes/CVs
1.Click Tools > Import People from Resumes. The Resume Importer screen is displayed.
2.Click the Import Options folder and setup required options before parsing begins. Option settings are remembered on the User's computer (in the Windows Registry)
3.Click File > Open then browse and select the Resumes/CVs to be processed.
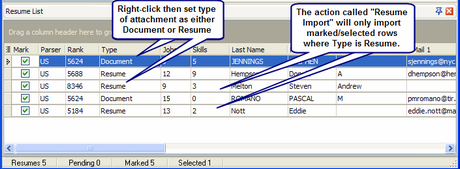
4.Monitor the Resumes count and Pending count in the bottom left corner of the Resume List while the Resumes/CVs are being parsed. When the Pending count is zero, parsing is complete.
Example: Resume List
5.Extracted data will be displayed in the Resume Data window, with documents that failed to parse listed in the Messages window in the top right corner.
Example: Messages about failed parsing

Stage 2: Edit Extracted Resume/CV Data
1.Setup the Resume List view options and column spacings to reflect your needs.
2.Click the View 1 option to display the Resumes List without line wrapping.
3.Click the Rank column heading in the Resume List to sort in ascending Rank sequence.
4.Edit or enter missing data in the Resume Data form. Use sorting and filtering techniques to identify groups of records that need attention.
5.Manually edit each Resume/CV where the Rank value is between 0 and 4500. These records are missing large amounts of information. Edited records will auto-update the Rank value.
6.Manually edit each Resume/CV where the Rank value is between 4500 and 5000. These records are missing either an Email address and/or a Phone number. Since this information is crucial for electronic communication with a candidate, its absence is a barrier to efficient interaction with candidates.
7.Create a Custom Filter on the Rank column for Rank >= 5100. This excludes Resumes/CVs where insufficient information has been extracted.
8.Click the Resume > Mark option to auto-mark all the filtered records. This identifies the records for import into the database.
Stage 3: Setup/Verify Import Options Before Importing into Database
1.Click View > Import Options.
2.Ensure that the Create List option is checked in order to auto-create a date-stamped People list of imported or updated records. Optionally add a suffix to the List name to make it more identifiable.
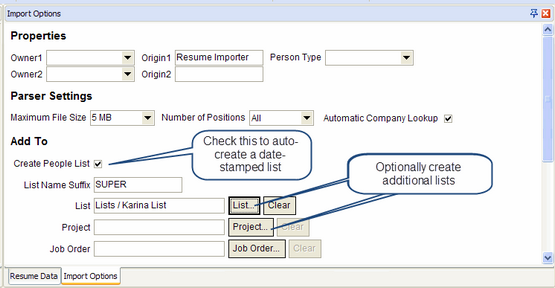
3.Edit the List Suffix as required. This text will be added to the end of the People list name.
4.Optionally create additional lists
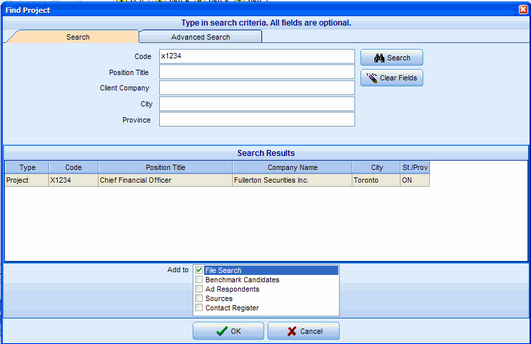
5.Attach list to a Project or Job Order
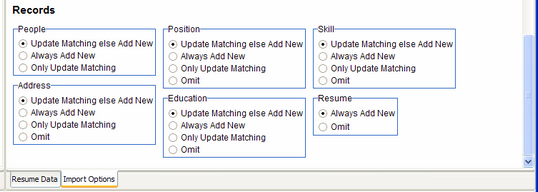
6.Review and edit the duplicate resolution options.
7.Click Import Resume > Import Marked Resume.
8.The Marked records will be imported into the database, and a summary of the results displayed.
Example: Import Statistics
9.The Rank value from the Resume List will update the Rating field in the People view.
10.The Marked records will then be deleted from the Resumes List.
Stage 4: Review Imported/Updated People Profiles
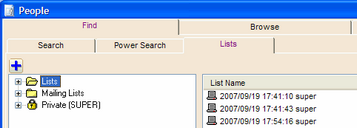
1.Open People > Find > Lists > Lists to see the auto-created People list. It is date and time stamped.
2.Review the accuracy of newly imported and merged Candidate records: check name, address, phones, email address, work experience, education history, company contacts, company past contacts, skills by position (Value, Measure, Level, Year Last Used).
3.Work history for Candidates is recorded on the Employment tab in the People view, and if an employer name exists in the Deskflow Companies table, the employment (Position) record Company name will be linked. If an exact Company name match is not found, the employer name is recorded in the work history record only.