A Deskflow Appointment assumes that the Deskflow Users' calendars are accessible to the current User who schedules the Appointment. This is only important for a multi-User or group Appointment. Access to other Users' diaries is a setting in the Deskflow Administrator utility. If a User's diary is not accessible, a Meeting request must be issued instead. The User can then accept or decline the Meeting request. An accepted Meeting request will then show in the Appointments panel.
Appointments that are scheduled in Deskflow are automatically exported to the User's Outlook diary.
However, if the User schedules an appointment in Deskflow, then synchronization MUST be initiated from the Deskflow Calendar view. When the Copy from Outlook icon is clicked, Outlook appointments (new or changed) are copied from Outlook to Deskflow and will therefore show up in the Deskflow Calendar.
To Schedule Appointment for Self:
1.From the Diary screen or the Deskflow Toolbar, click the Appointment icon, ![]() . The Task Editor dialog box displays and the current User becomes the default.
. The Task Editor dialog box displays and the current User becomes the default.
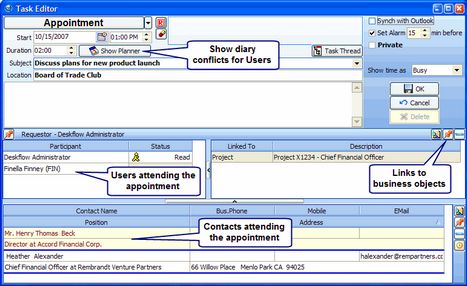
2.Click the Select Participant(s) icon to add Deskflow Users to the Appointment.
3.Select Deskflow Users required to attend the Appointment.
4.Click the Link to Contact(s) icon.
5.Select external Contacts involved in the Appointment. Email invites are not sent to the Contacts
6.Enter a Subject.
7.Enter an optional Location
8.Enter Details.
9.Select a Start Date and Start Time by clicking the Calendar icon
10.Select a Duration.
11.Click Show Planner to display potential Diary conflicts
12.Click Synch with Outlook. Default is set in the Administrator
13.Optionally click Set Alarm and warning time
14.Optionally click Private
15.Optionally set Show time as Busy or Free or Tentative or Out of Office
16.Optionally link the Appointment to a business object (Company, Project, Job Order, Opportunity, Introduction or Document)
17.Click OK.
Example: Schedule Appointment with Deskflow Users and External Contacts
Example: Options for Location, Private and Show time as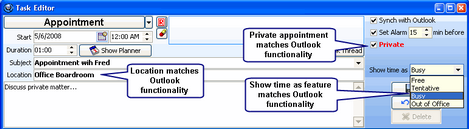
To Schedule Appointment for Another User:
1.From the Diary screen or the Deskflow Toolbar, click the Appointment icon, ![]() . The Task Editor dialog box displays and the current User becomes the default.
. The Task Editor dialog box displays and the current User becomes the default.
2.Click the Select Participant(s) icon to add Deskflow Users to the Appointment.
3.Uncheck your own User name as a Participant of the Appointment
4.Select the other Deskflow User who is to participate in the Appointment.
5.Click the Link to Contact(s) icon.
6.Select external Contacts involved in the Appointment. Email invites are not sent to the Contacts
7.Enter a Subject.
8.Enter an optional Location
9.Enter Details.
10.Select a Start Date and Start Time by clicking the Calendar icon
11.Select a Duration.
12.Click Show Planner to display potential Diary conflicts
13.Click Synch with Outlook if not already set. Default is set in the Administrator
14.Optionally click Set Alarm and warning time
15.Optionally click Private
16.Optionally set Show time as Busy or Free or Tentative or Out of Office
17.Optionally link the Appointment to a business object (Company, Project, Job Order, Opportunity, Introduction or Document)
18.Click OK.
19.Other User will see Appointment in his/her Deskflow calendar.
20.After 1 minute, a timer will go off and initiate a transfer of this appointment to Outlook. Other User will have to give approval though.
To Perform an Action on an Appointment:
1.Right-click the Appointment reference
2.Either select Edit Details / Delete then perform one or more of these actions:
•Edit any of the details of the Appointment
•Optionally click Delete
3.OR click View Task Thread
4.OR click Complete for me (or Complete for All in the case of a multi-User Appointment)
To Edit Details of Own Appointment:
1.From the Diary screen, right-click on the Appointment. A pop-up list appears.
2.Select Edit Details / Delete
3.Edit the details or change the date/time if necessary
4.Click OK to save the changes
To Edit Details of Delegated Appointment: (entered by you for another User)
1.From the Diary screen, right-click on the Appointment. A pop-up list appears.
2.Select Edit Details / Delete
3.Edit the details or change the date/time if necessary.
4.Ensure that the Synch with Outlook box is checked
5.Click OK
To Complete Own Appointment:
1.From the Diary screen, right-click on the Appointment. A pop-up list appears.
2.From the pop-up list, select Complete or Complete for All
3.Type the details.
4.Click the Create New Activity History check box.
5.Click OK.
6.Enter the Activity History notes.
7.Click OK.
NOTE: You can create a follow-up task, appointment, or phone call that will show a thread to this task. The follow-up task will have a line added in the Details of the follow-up task that says, Task as a result of "subject of the completed task". When viewing the thread of the follow-up task, appointment or phone call, the originating task will be listed in the thread.