IMPORTANT: Before starting to use the newly installed Deskflow Client program, determine if your workstation or laptop is configured properly, as follows:
Start the Deskflow Client as below, but hold down the Shift key when clicking the Login button.
Diagnostics will be run on your PC workstation and the results displayed.
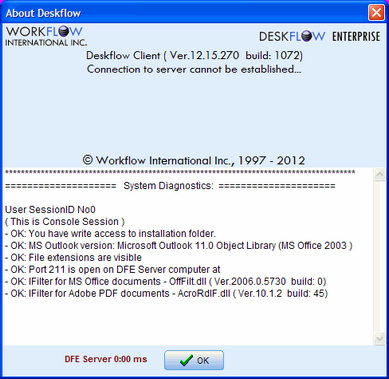
If everything is configured correctly, exit the diagnostic message and proceed to start the Deskflow Client as below
To Start the Deskflow Client:
1.From your Desktop, double-click the Deskflow icon. The Deskflow login screen appears:
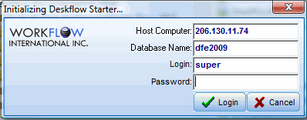
2.In the Host Computer field, type your Host Computer IP address or Domain Name (127.0.0.1 is only an example and should be replaced by the appropriate IP address or Domain Name).
3.In the Database Name field, type the database name (not case sensitive).
4.In the Login field, type your Login name (no more that 10 characters and not case sensitive).
5.In the Password field, type your Password (case sensitive).
6.Click the Login button. Deskflow begins to initialize a startup.
NOTE: If any one of the four login fields is typed incorrectly, you will receive a Login Failed message.
Deskflow connects to the remote database and a Deskflow Toolbar displays on the desktop. While the connection is taking place, there may be a brief status message.
The icons that appear in the Deskflow Toolbar depend on your User responsibilities set up in the Deskflow Administrator utility according to the Workgroup you are assigned to.
Example: Deskflow Toolbar

Deskflow connects from the workstation to the remote Deskflow Application Server, which in tum connects to the Database Server where the Deskflow SQL database in installed.