To Auto-create Candidate Profiles from Email Attachments:
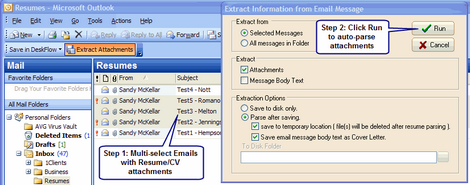
1.Highlight one or more emails that have Resume/CV attachments (use ALT+Click for multi-select).
2.Click Extract Attachments icon in the Outlook toolbar.
3.Click Run in the dialog box "Extract Information from Email Message".
Example: Emailed Resume Content Extraction
4.Select the Parser Language to be used on the selected emails, then click OK
Example: Resume List and Attachment Types
All selected Resumes/CVs and Candidates show up in the view below
1.The bottom window shows a sortable list of Candidate names and extracted data.
2.The top left window shows the text version of the Resume/CV selected in the list.
3.The top centre window displays data extracted from the text Resume/CV.
4.The top right window displays default Import Options. This may be closed if not needed.
5.The Rank column when shorted shows the best quality extractions at the top of the list.
6.Drag-and-drop missing or incorrect words from the Resume/CV to the form on the right.
7.Delete records that have too much missing data (Rank less than 5100).
8.Click Import Resume > Import Marked Resume as the final step.
To Parse Resumes/CVs saved in a Windows folder:
1.Highlight one or more Resumes/CVs then drag & drop them onto the Resume Importer view
2.OR drag & drop an entire Windows folder onto the Resume Importer view
3.Parsed results are shown in the data window.
To Import Parsed Data into the Database
1.Manually review and edit extracted data that is displayed in the Resume Data window.
2.Run the Company Lookup function on selected records. This shows which companies already exist for a candidate's profile.
3.For the Employer field in individual Position records, right-click to perform a Company lookup for existing Company records
4.Manually select and Mark data records in the Resume/CV list...
5.OR to save time, auto-select data records with Rank value greater than 5,100 (= Firstname+lastname+email), then mark all visible records. Rank values are composed of an aggregate of the following point scores:
First name = 2000 points
Last name = 2000 points
Email address = 1000 points for each one
Phone number = 200 points for each one
City = 20 points
State/Province = 20 points
PostalCode = 20 points
Country = 20 points
Job Title = 10 points
Department = 10 points
Employers = 10 points
Education/Institution = 2 points
Experience date range = 1 point
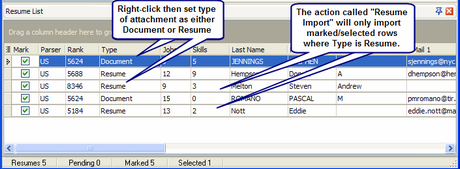
6.Review the Resume List. The Type column will default to Resume for all rows. Right click on a row to re-classify the attachment type as Document. Documents will not be parsed and therefore will not be imported. Only selected/marked rows where Type=Resume will be imported.
7.If the Import Options panel is not already visible, click View > Import Options.
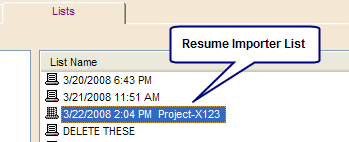
8.In the Import Options window, enter a unique Suffix to clearly identify the list about to be imported. This list name suffix will be appended to the List name that is auto-created in the People Lists folder. The list name structure is Date+Time+Suffix. Sometimes it is useful to assign a Project Code or Job Code as the Suffix. Then the list can be imported into the appropriate business objects.
9.In the Import Options window, setup import preferences for each of the six record types. These preferences always revert back to the default settings after each list is imported. The default preferences assure that if the same Resume/CV is imported a second time, no changes are made to the original record.
•People (primary record)
•Address (child record)
•Position (child record)
•Education (child record)
•Skill (child record)
•Resume/CV (child record)
10.Click Import Resume > Import Marked Resume
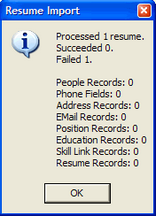
11.A summary Success/Failure report is displayed on screen (see example below).
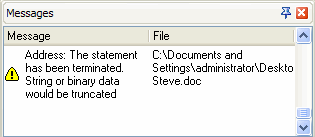
12.A Messages window at the bottom right corner shows why an Import failure occurred.
13.Open and review the imported People list that is auto-created as Date+Time+Suffix
Note: Import Options always reset back to default values after use.
Example: Resume Importer Success/Failure Report
Example: Resume Importer Error Messages
Example: Resume Importer List