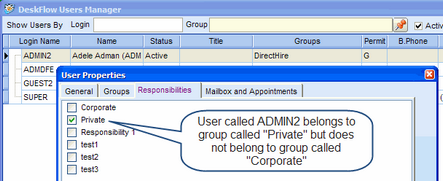
The User Responsibilities feature, also known as Privacy Groups, sets up one or more Privacy Groups to which a User can belong.
A maximum of three Privacy Groups can be assigned to a Person record.
A maximum of one Privacy Group can be assigned to a Project record.
A maximum of one Privacy Group can be assigned to a Job Order.
If a User belongs to a Privacy Group, then assigning that Privacy Group to a selected Person record will give that User private access to the Person record. Only other Users in the same Privacy group will be able to access and view the designated Person record.
For example, if a User has a privacy code of GREEN, then the User can only see records that are tagged as GREEN or records that are not tagged at all.
Similar rules apply to Projects and Job Orders.
In essence, People, Project and Job Order records can be classified as private and therefore out of bounds to all other Users, including the top-level system administrator. When unprivileged Users search for records, none that are marked Private will be found.
There are some places where minimal information about private records can be seen by other Users.
For example, if a Candidate record previously labeled private has been added to a Project register such as the File Search or Contact Register, then that candidate's name, job title and employer name will be visible, as well as the Activity History and text version of the resume. A non-privileged User will not be able to zoom to the candidate record. But a User with Privacy Group rights can access and view the candidate record.
To Create Privacy Groups:
1.Open Lookup Tables Editor with the Deskflow Administrator utility
2.Select Responsibilities
3.Click Edit Contents
4.Edit Content and add records
5.Save changes
To Setup Privacy Groups:
1.Set the flag called Use User's Responsibilities in the Administrator utility
2.Open Deskflow Users Manager
3.Double-click User name
4.Allocate User to one or more Privacy Groups
Example: Enable User Responsibilities feature

Example: Setup User Privacy Group Memberships

To Assign a Privacy Group to a Person:
1.Open the Person record
2.Open the Resp sub-tab on the main Person tab
3.Select a Privacy Group name from the drop down list
4.Click Save in the right margin of the People record
Example: Assign Privacy Group to Person

To Assign a Privacy Group to a Project:
1.Open the Project record
2.Open the Teams tab
3.Select the Hiring Responsibility field
4.Select a Privacy Group name from the drop down list
5.Click Save in the right margin of the Project record
Example: Assign Privacy Group to Project

To Assign a Privacy Group to a Job Order:
1.Open the Job Order record
2.Open the Job Requirements and Hiring Responsibility sub tab
3.Select the Hiring Responsibility field
4.Select a Privacy Group name from the drop down list
5.Click Save in the right margin of the Job Order record
Example: Assign Privacy Group to Job Order
