The Deskflow Diary can work independently of Outlook, but usually it is set up to synchronize with the Outlook calendar.
•New Deskflow Appointments automatically copy to Outlook.
•Outlook Appointments do not auto-copy to Deskflow - the Copy from Outlook icon must be clicked.
•Deskflow Tasks do not synchronize with Outlook Tasks.
To Setup Matching Time Zones in Windows and Deskflow
1.Double-click the Windows clock icon in the bottom right corner of the screen.
2.Setup Date & Time then setup Time Zone
3.Click OK
4.In Deskflow, click Edit > Change My Time Zone
5.Select the same Time Zone as in paragraph 2 above. Deskflow and Windows Time Zones must match.
6.If there is a mismatch between Deskflow Time Zone and Windows Time Zone, a Change My Time Zone reminder message will occur every time you login to Deskflow (see below).
Example: Change My Time Zone

To Open The Deskflow Diary:
1.From the Deskflow Toolbar, click Diary. The Deskflow Diary is displayed.
To Synchronize Deskflow and Outlook Diaries
1.The Deskflow Administrator must be used to set up the following system-wide options:
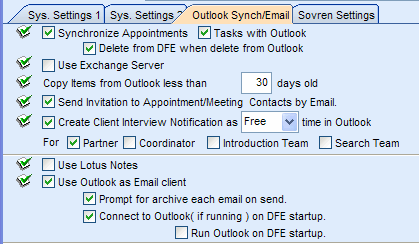
a.Synchronize Appointments (Outlook)
b.Tasks with Outlook
c.Delete from DFE when delete from Outlook
d.Use Exchange Server (if it is in use)
e.Copy Appointments from Outlook less than 15 (or XX) days old
f.Send Invitation to Appointment/Meeting Contacts by Email
g.Create Client Interview Notification as Free or Busy time in Outlook (works for both Projects and Job Orders) for options: Partner (JO Consultant 1), and Coordinator (JO Consultant 2), Introduction Team, Search Team
Example: Outlook Synchronization Options

h.Use Lotus Notes
i.Use Outlook as Email client
| Prompt for archive each email on send |
| Connect to Outlook (if running) on DFE Startup |
| Run Outlook on DFE startup |
2.Open the Deskflow diary
3.Click the Copy from Outlook icon ![]() to initiate the Outlook to Deskflow synchronization
to initiate the Outlook to Deskflow synchronization
4.Deskflow-created Meetings will automatically copy to the Outlook diary as Free time
Diary Layout:
•The time list on the far left shows the adjustable time scale.
•The panel on the left side displays Appointments for days selected in the Date Navigator.
•The panel on the right side displays Tasks & Phone calls for days selected in the Date Navigator
•The panel on the bottom left displays details of the selected Appointment or Task, including Participants.
•The panel in the top right corner shows a multi-month Calendar.
•The panel on the bottom right displays details of Contacts and business object Links.
Example: Deskflow Diary showing Appointments and Tasks

Select Days or Weeks with the Date Navigator:
The date navigator is used to select one of the following date ranges:
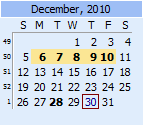
•1 to 7 days in a single week or across two weeks
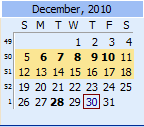
•two weeks starting on a Sunday
•three weeks starting on a Sunday
•four weeks starting on a Sunday
•five weeks starting on a Sunday
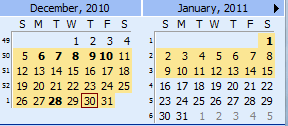
•six weeks starting on a Sunday
Example: Date Navigator - Partial week selection

Example: Date Navigator - Two week selection

Example: Date Navigator - Six week selection

To Schedule, Display and Edit Appointments (left panel):
1.Select a time slot for a new Appointment, right-click in the Appointments panel, then select New Appointment. Add details as needed. The time is automatically inserted but may be changed.
2.Right click on an uncompleted Appointment to Show/Edit Appointment details.
3.For a new Appointment, invite multiple Users and Contacts to attend. Only Users for which you have Calendar access may be selected. A copy of the Appointment is made to the Outlook calendar of the participating User(s).
4.Toggle relative panel sizes with the double-arrow icons in the toolbar at the top of the Diary.
5.To complete an Appointment, right-click. From the list, click Complete for me.
6.To complete a multi-User Appointment, right-click. From the list, click Complete for me.
7.To complete a multi-User Appointment for all Participants, right-click. From the list, click Complete for All.
8.Click Print to print Appointments for today. Select a template from the list
9.Move the mouse pointer over an Appointment or click an Appointment to see details in the bottom left panel.
10.To display a Day, Week, Workweek, Month or Year view of Appointments, click Options > View Mode
11.The Calendar at the top right shows current month and day by default.
12.To automatically include a Contact’s or Candidate’s name in an Appointment, select either a personal profile or a person’s name from a list, then press ALT+T.
To Schedule, Display and Edit Tasks and Phone Calls (right window):
1.Hide completed tasks by clicking the Hide Completed Tasks check box.
2.Overdue tasks are shown in red.
3.Completed tasks are shown in green.
4.Toggle the window size with the double-arrow icons at the top right corner.
5.Move the mouse pointer over a task or click a task to view details in the bottom left window.
6.To complete a task, right-click a task. A pop-up list appears.
7.From the pop-up list, click Complete.
8.To complete a multi-User task for yourself, click Complete for Me.
9.To complete a multi-User task for all participants, click Complete for All.
10.Click the printer icon to print appointments and tasks for today.
11.The Calendar at the bottom right shows current month and day by default.
My Month View:
1.Shows all My Appointments and Interviews for any month (default is current month). This view does not show Tasks.
2.Colours indicate overdue, completed, or current status.
3.Right click any item to show action list.
4.Print a month view.